

A sliding knot is a handy and neat way to finish your jewelry. Because you can adjust it it is very handy knot tu use when you sell jewelry because then you don’t have to make a bunch of different sizes of the same piece. You mostly see it used for bracelets but you can also use it to tie necklaces. The sliding knot can be used in pretty much every different kind of cord. Here are three of the most used techniques with step by step instructions.
1. Sliding Knot in Macrame Cord
This adjustable knot is made with an extra piece of cord. You tie a couple of macrame knots, minimum of two up to as much as you want. This knot works perfectly in macrame cord but also in waxed cord. If you are using waxed cord with a smooth wax layer then make sure to tie every knot nice and tight and always finish with some jewelry glue. When putting the bracelet on and taking it of the threads are moving through the knot and you don’t want it to come loose over time.
In this tutorial we show you how to make this knot. With the contrasting pink and green it is very easy to follow.
Want to make your own macrame bracelets with a sliding knot? Here’s a list of the materials we used.
2. Sliding Knot in Elastic, Leather and Suede Cord
This sliding knot is different from the first and better suitable for thicker elastic cord, suede cord and even leather. This version of the sliding knot isn’t only used for bracelets but works perfect for necklaces made from suede or leather. Very nice if you want a bangle / charm necklace that can be sometimes worn as a choker and other times adjusted to a longer necklace.
Check our video tutorial to see how easy you can make this knot.
Want to start making your own? You can find the materials we used at Beads & Basics webshop
3. Sliding Knot with 1 Loop
This technique looks a little bit like the first one only the knot is much smaller. Can be used in waxed cord, leather, satin cord and suede.
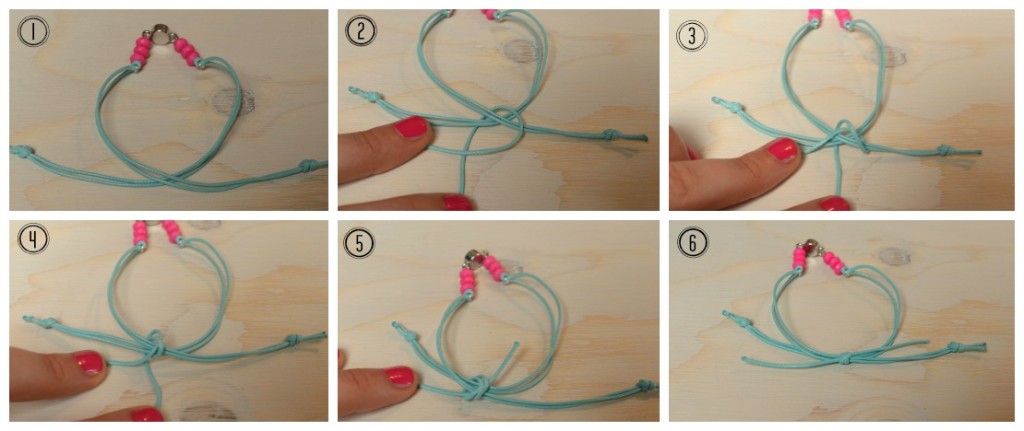
1. Put the ends of yuor bracelet on the table as in photo 1
2. Cut a piece of waxed cord of about 10 centimeter and make a loop around both ends of the bracelet.
3. Take the left thread and make another loop around the bracelet ends.
4. String the left cord through both loops you just made.
5-6. Pull both ends of the 10cm waxed cord to make a sliding knot.
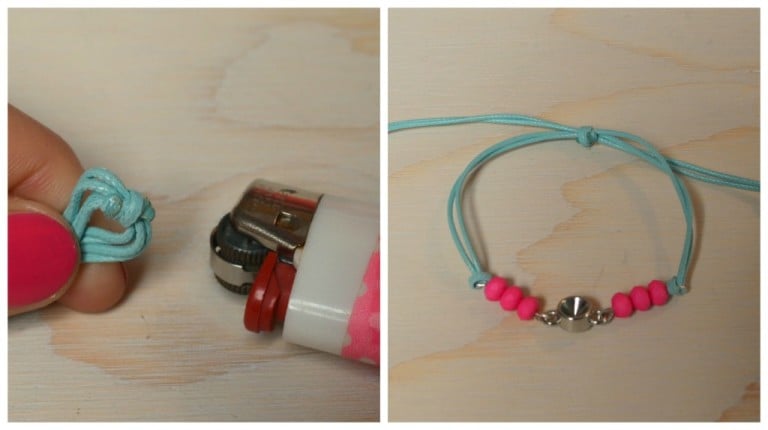
Cut the remaining pieces of the waxed cord, leave about half a centimeter on both sides and carefully burn both ends with a lighter. That’s your sliding knot finished!
You can finish the other ends of the bracelet with a bead and knot or simply a knot.
Different knots for different styles of jewelry. All the techniques can be used the same for bracelets or necklaces.
Although it may look a bit complicated, you will see after a couple of tries these knots are easy to make.
What do you think?
What is your favorite technique to use? Do you make your own jewelry?
Feel free to leave a link to your site and social media in the comments, we love to see what you are making!
Want to Learn more Jewelry Techniques?
Join over 3 million viewers on our Youtube channel Beads & Basics

Enjoy creating!
Love,
Monique